 Thanks: 0
 Likes: 0
 Dislikes: 0
-
-
Super Member

Re: Removing swirls on a Ford Lightening
-
Re: Removing swirls on a Ford Lightening
That's amazing. It seems like you are a great instructor Mike.
-
Super Member

-
I have one of these in the garage now waiting for the owner to pick up. I didn't get any before pictures, but it was in horrible condition.
I've always had a soft spot for these trucks.
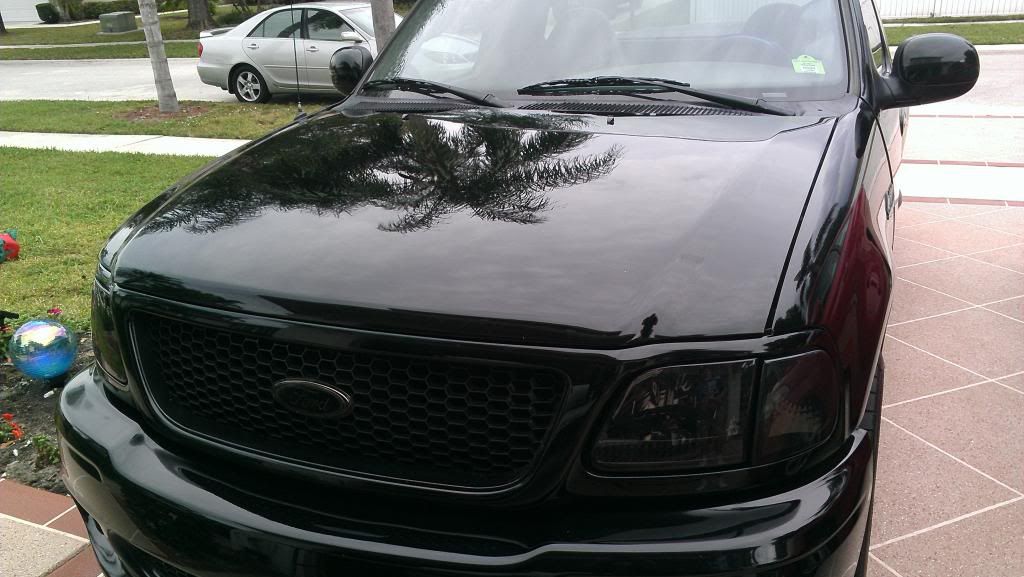
Great job bringing the shine back out in the paint, Mike and Gary!
Sent from my SAMSUNG-SGH-I777 using AG Online
-
 Re: Removing swirls on a Ford Lightening Re: Removing swirls on a Ford Lightening
I've always loved the power from these classic trucks!
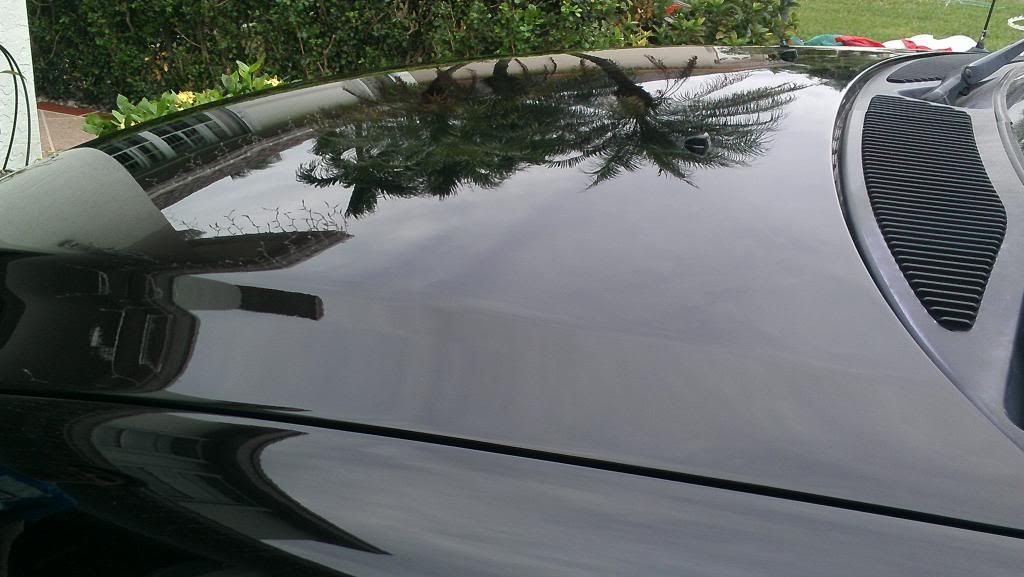
@ Merlin, great job on the turnaround on that truck and it's great you are showing someone the ropes. I see the windshield sprayers taped up but was it not on the cowl? Not sure if that is compound\polish or wax on the cowl in the 2nd pic but cleaning that off can be a pain for sure and easy to just tape up.
Sorry, just making an observation.... I made the mistake of getting PBL cleansing lotion on some trim between the windows and it's a pain to get off. Lesson learned very quickly for me!
-
Super Member

Re: Removing swirls on a Ford Lightening
True, I didn't tape/cover the cowl. IMHO It depends on the polish. In this case, that little bit of polish cleaned right off before I detailed the trim.
I will say that with this particular hood/cowl design I have been able to open the hood & place a regular beach towel lengthwise into the engine bay.
I then take the top edge of the towel and tape it to the windshield. This process winds up protecting the cowl and the wipers from any splatter.
NOTE: I learned this trick from my old M105 days.
Depending on the polish/compound you are using that "towel on the cowl" procedure keeps all kinds of splatter from getting into the wiper cowl.
The only down side is that when you're polishing close to the top edge of the hood (if you're not careful) you can grab the towel with your pad.
If you get compound splatter into those little holes and cowl grooves it's a PAIN to clean on this truck. I am happy the polish I used didn't splatter.
-
Super Member

Re: Removing swirls on a Ford Lightening
wow what a great turnaround
-
Re: Removing swirls on a Ford Lightening
 Originally Posted by merlin

True, I didn't tape/cover the cowl. IMHO It depends on the polish. In this case, that little bit of polish cleaned right off before I detailed the trim.
I will say that with this particular hood/cowl design I have been able to open the hood & place a regular beach towel lengthwise into the engine bay.
I then take the top edge of the towel and tape it to the windshield. This process winds up protecting the cowl and the wipers from any splatter.
Like this...
The Beach Towel Tip
Here's a tip I use on some cars I detail to cover and protect the plastic surrounding the wiper arms at the back edge of the hood of cars, just before the windshield.
Beach Towels tend to be longer in one direction than the average bath towel; on average, beach towels run around 60" or 70" in length. Where this comes in handy over a bath towel is that your average car, truck or s.u.v. windshield is around 5' to 6' across so a Beach Towel is usually long enough to cover and protect the plastic, wiper arms, and glass in one fell swoop whereas the average bath towel falls short.
See if you can relate...
Sometimes it seems like splatter, that is the little white dots of product that land on the glass can be some of the hardest little things to remove 100%, not to mention time-consuming. So with this technique you can avoid the hassle entirely.
This tip is mostly for working with rotary buffers as they will tend to sling-out splatter more than machines like the Flex 3401, the Cyclo and DA Polishers like the Porter Cable.
I have seen people lift these other non-rotary buffers off hoods while the pad is still spinning at a high rate of speed and completely cover a windshield with splatter so it does happen. See these threads,
Here's a tip... don't lift the pad off the paint till you've turned the polisher off and the spinning pad has slowed down...
What not to do when detailing a car!
I know detailers that never tape-off or cover anything up and that's okay too, it's personal preference and it could be that you're just incredibly careful as well as incredibly good at this craft. It could also mean the cars you're working on it won't matter if you do get spatter into hard to detail areas.
For the rest us, here's how you use a Beach Towel to cover-up and protect areas you don't want to get splatter onto or into and then have to "detail" these areas and components later, after the polishing and waxing is over.
This is a stylish Beach Towel I found at Walgreens for around $6.00, my normal towel is white and ugly so I thought this would make for a more fun how-to article. Just to note you could also use paper or plastic, whatever works for you... I like Beach Towels for a number of reasons that paper and plastic don't offer but I have used both plastic, (2 mil painter's drop cloths), and paper, (usually newspaper but painter's masking paper works great too).

Here's the area I'm talking about that you want to cover up on modern cars, they often have plastic material with grill or vent openings that if you get splatter onto and into these areas it can be difficult and time consuming to remove.
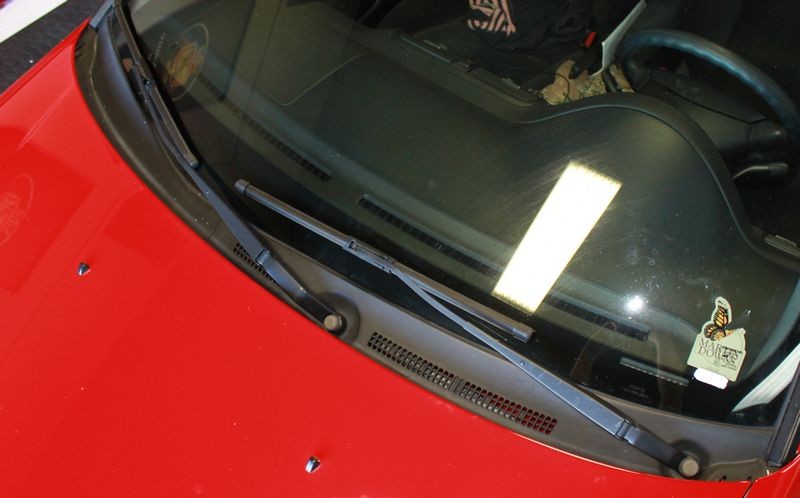
In most cases, if you're restoring the paint on someone's daily driver, not only is the paint neglected but the plastic is neglected meaning it's weathered, dried and dull and it seems like splatter really likes to stick hard to plastic in this condition.
If you do get splatter on these areas, it's also very unsightly and your customer might not appreciate it if you don't remove it. So with this technique, you never get splatter into and onto these areas in the first place. The old an ounce of prevention idea...
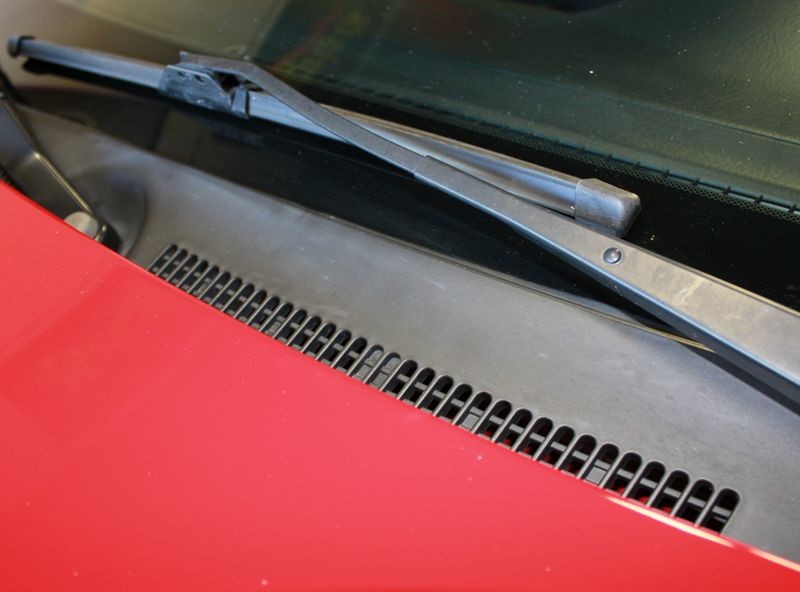
Not only does a Beach Towel work well for this type of job you can also re-wash it and use it again... so it's green technique...
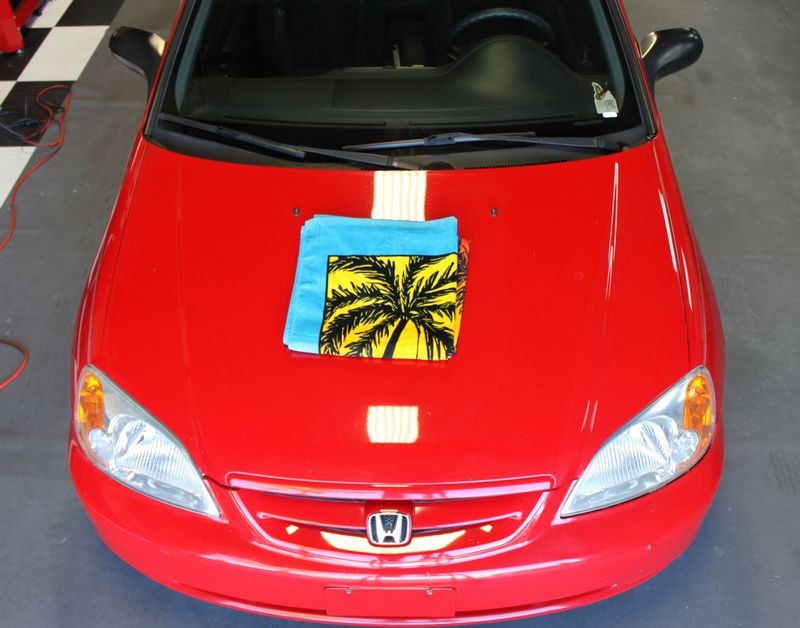
Start by opening the hood and locating a place to tape one edge of the towel too, make sure the ends of the towel don't bind in the hinge mechanism and don't place dry cloth anywhere on a hot engine where it could be a fire danger or get caught into any moving parts. In other words, use common sense.
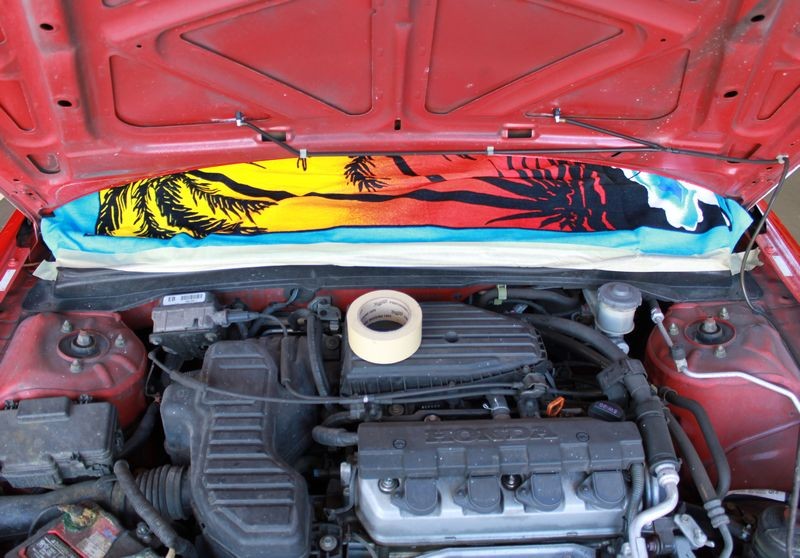
After carefully closing the hood, then use some Painter's Tape to affix the towel to the windshield so it doesn't fall down and if you're also taping off other plastic, vinyl or rubber trim, then tape-off these components accordingly.
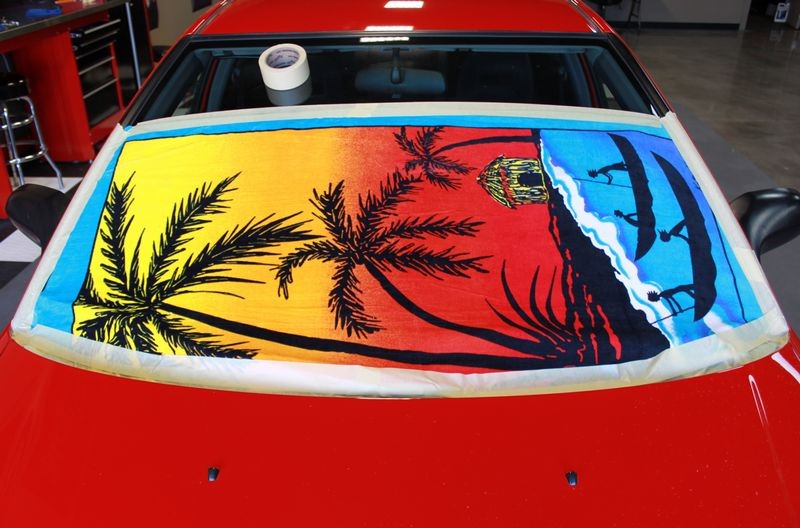
In this instance the towel did not reach all the way to the top of the windshield; this is okay however because the sling and splatter is mostly an issue for the lower portions adjacent to the hood where the buffing is taking place. You can also use this for the rear window. Side windows are not usually a problem for the glass because the panels are vertical.

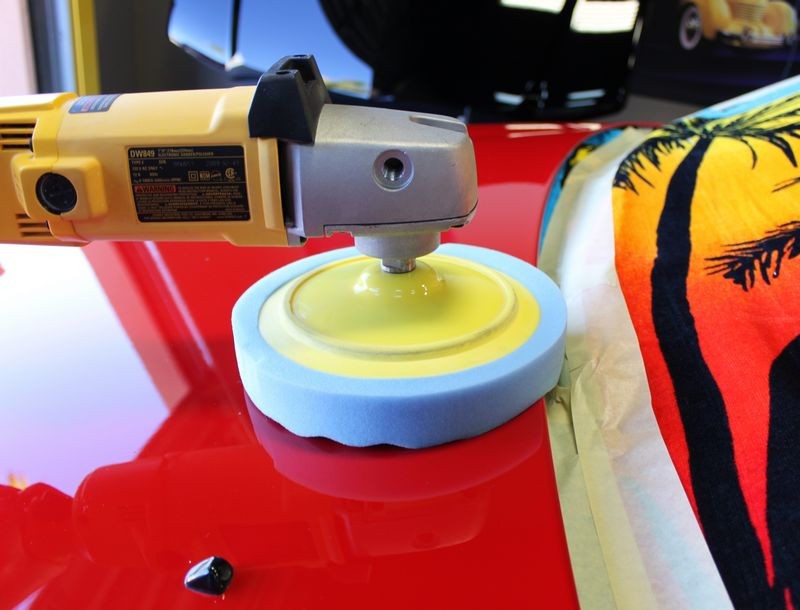
Notice how I've run a couple of strips of wide tape along where the Beach Towel meets the rear edge of the hood?


In some cases, the design of the vehicle means there's no gap or air space between the edge of the hood and the glass or wiper arm area, in these cases, you have to be careful when running your polisher not to run the buffing pad into the Beach Towel because the nap is grippy and your buffing pad could grab it and yank it into itself.
So for cars with a low or no air-gap between the paint and the area you're trying to cover up, being careful when buffing these areas is important, but I also run a couple of strips of tape across this area as a buffing pad that's lubricated with product will just bump into the tape, it won't snag it and possibly pull it off the area and into the pad.
Just an extra safety precaution, you can decide how DO or AR you want to get.

-
Super Member

Re: Removing swirls on a Ford Lightning
 Originally Posted by Mike.Phillips@Autogeek

Yepper that it! 
Once you spend hours cleaning a hard stubborn compound (like M101) out of all those little tiny areas you will never forget this tip.
Similar Threads
-
By 04lss in forum Auto Detailing 101
Replies: 7
Last Post: 04-25-2017, 11:39 AM
-
By david b in forum RV & Motorhome Detailing
Replies: 2
Last Post: 12-14-2016, 09:33 PM
-
By natesmobiledetailing in forum Auto Detailing 101
Replies: 6
Last Post: 08-09-2014, 11:22 AM
-
By keeganjacobs in forum Ask your detailing questions!
Replies: 7
Last Post: 12-13-2012, 09:45 PM
-
By happyone in forum Ask your detailing questions!
Replies: 7
Last Post: 03-20-2012, 06:47 AM
 Members who have read this thread: 0
There are no members to list at the moment.
 Posting Permissions
- You may not post new threads
- You may not post replies
- You may not post attachments
- You may not edit your posts
-
Forum Rules
|
| S |
M |
T |
W |
T |
F |
S |
| 31 |
1
|
2
|
3
|
4
|
5
|
6
|
|
7
|
8
|
9
|
10
|
11
|
12
|
13
|
|
14
|
15
|
16
|
17
|
18
|
19
|
20
|
|
21
|
22
|
23
|
24
|
25
|
26
|
27
|
|
28
|
29
|
30
| 1 | 2 | 3 | 4 |
|


 Thanks:
  Likes:
  Dislikes:




 Reply With Quote


Bookmarks