 Thanks: 0
 Likes: 0
 Dislikes: 0
-
Junior Member

WG TSR/FG & PC 7335 Technique
WG TSR/FG & PC 7335 Technique
Hey Mike,
So I have finally begun the paint correction process on my Vette closely following the advice you have given me in the following thread I posted:
http://www.autogeekonline.net/forum/...ce-please.html
Now that I am on my way, I have some observations and further questions.
As you predicted, the G100/PC7335 is doing the job, but very slowly, and also requiring MANY section passes. Sometimes I need to go back and do again. I'm using a 5.5 CCS orange pad with WG TSR. I'm using a 5.5 CCS white pad with WG FG. I will definitely be purchasing a new DA in the spring!!!
Now, a couple of questions for you kind sir:
1. PC Speed/Downward Pressure - Being that I have an underpowered first generation DA, am I safe running at 6.0 with TSR? I presume I should be applying as much down pressure possible before the DA stops rotating and starts vibrating. Should I also do the same for FG and how much downward pressure should I be applying? How many section passes per area should I be doing in general for final polishing?
2. Jeweling/Burnishing - Would it be beneficial or a waste of time after I'm finished polishing with FG to go back again with a grey or blue pad polish again with FG?
3. Rough Feel After FG - I've noticed that the finish does not feel smooth after using FG. It's rather rough actually. When I wipe down with QD, the slickness returns. Am I doing something wrong or causing damage?
4. Paint Polish Enhancer - I have a bottle sitting on my shelf begging to be used. Does this product factor into this correction process or should I just reserve using that for when I want to strip old wax/sealant before applying new?
Thanks in advance for your continued support! 
Steve
-
Re: WG TSR/FG & PC 7335 Technique
 Originally Posted by xxxc5

Hey Mike,
So I have finally begun the paint correction process on my Vette closely following the advice you have given me in the following thread I posted:
http://www.autogeekonline.net/forum/...ce-please.html
Now that I am on my way, I have some observations and further questions.
As you predicted, the G100/PC7335 is doing the job, but very slowly, and also requiring MANY section passes. Sometimes I need to go back and do again. I'm using a 5.5 CCS orange pad with WG TSR. I'm using a 5.5 CCS white pad with WG FG. I will definitely be purchasing a new DA in the spring!!!
I always feel kind of bad when I tell people it's going to be harder and take longer using a first generation DA style polisher but that is the fact. The new XP and GG have so much more power it's not even funny.
I was buffing out a 1954 Mercedes-Benz on Dallas a few weeks ago and as long as I held the pad flat the new GG ROP worked just like a rotary buffer. I couldn't stop it from rotating the pad and it was removing swirls and scratches like nobody's business and unlike a rotary buffer it was so easy to use.
Swirled-out 1954 Mercedes-Benz

Cropped out of the above original
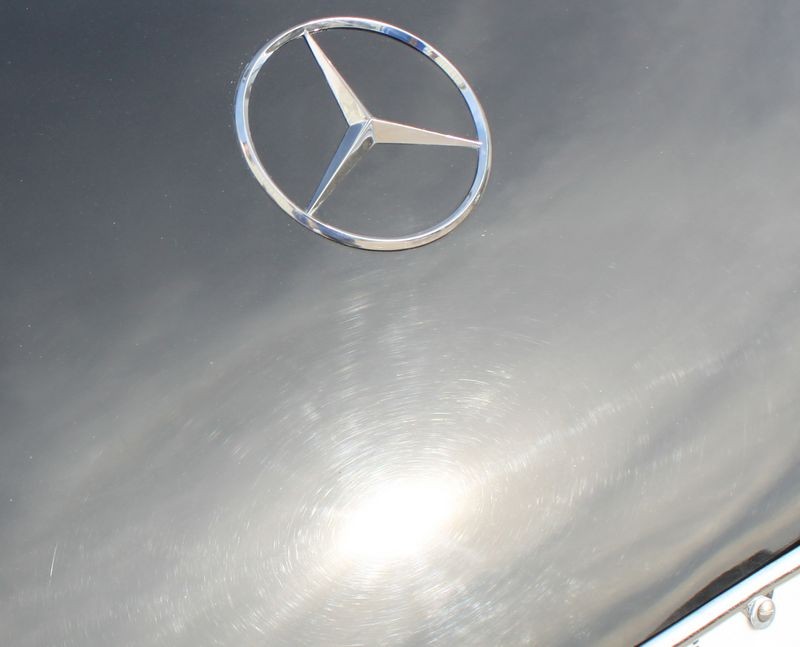
WG TSR with a Green Kompressor Cutting Foam Pad on the GG ROP Speed Setting 6.0
After
Same section only zoomed in on the Van in the reflection.

Originally Posted by xxxc5
Now, a couple of questions for you kind sir:
1. PC Speed/Downward Pressure - Being that I have an underpowered first generation DA, am I safe running at 6.0 with TSR?
I presume I should be applying as much down pressure possible before the DA stops rotating and starts vibrating.
Yes. Because of the typical paint hardness associated with modern Corvettes, at this point you have to do whatever it is you can to keep the pad rotating.
Paint is removed best when the pad is rotating, the kinder, more gentle and fluffy way of saying this is,
Swirls are removed best when the pad is rotating, not just vibrating against the paint.
Originally Posted by xxxc5
Should I also do the same for FG and how much downward pressure should I be applying? How many section passes per area should I be doing in general for final polishing?
No.
The swirls need to be removed using your first step product and process, (FSP), your second step process, (SSP), is to further refine your results from the FSP, in your case it will be to remove any hazing left by using an aggressive foam cutting pad on a DA Polisher.
You can run at 6.0 but that's so violent that if you can keep your pad rotating at 5.0 it's a lot easier on you. You shouldn't have to use as much pressure for the FG so you should be able to keep your pd rotating/oscillating on the 5.0 speed setting.
With any process using a first generation PC style polisher, as soon as you notice the pad to stop rotating under pressure, one way to restore pad rotation and oscillation is to switch to a clean, dry pad. Of course this means having more clean, dry pads on hand.
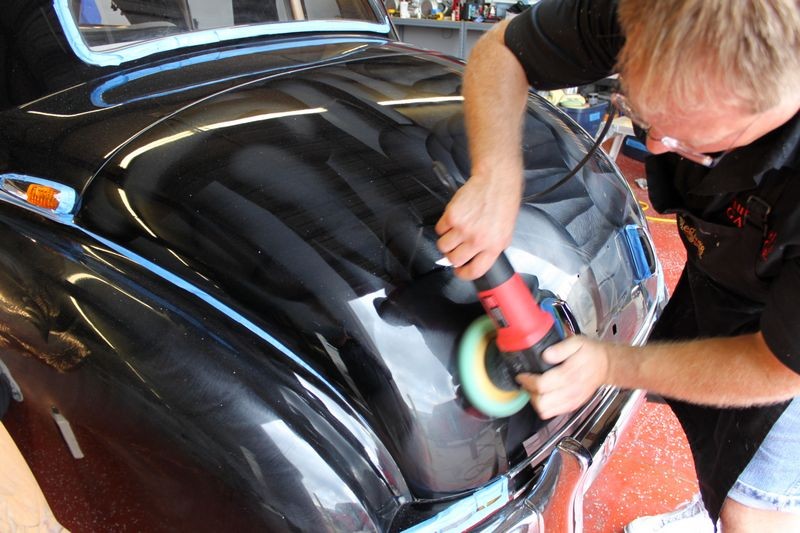
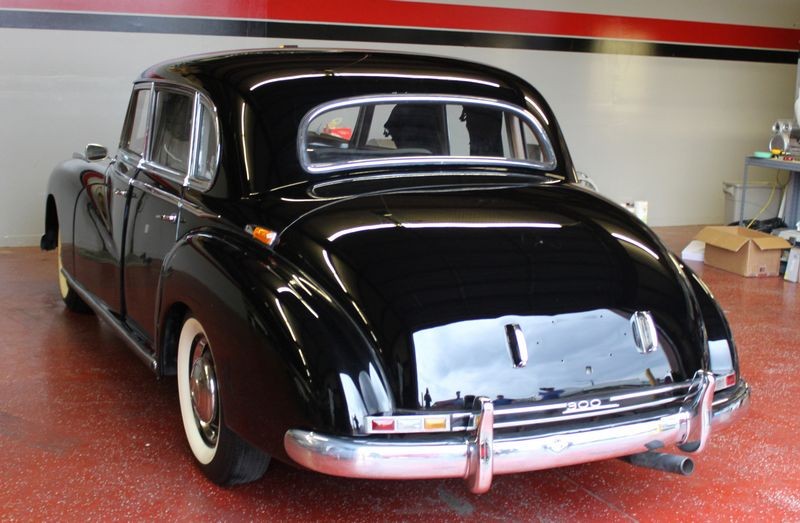
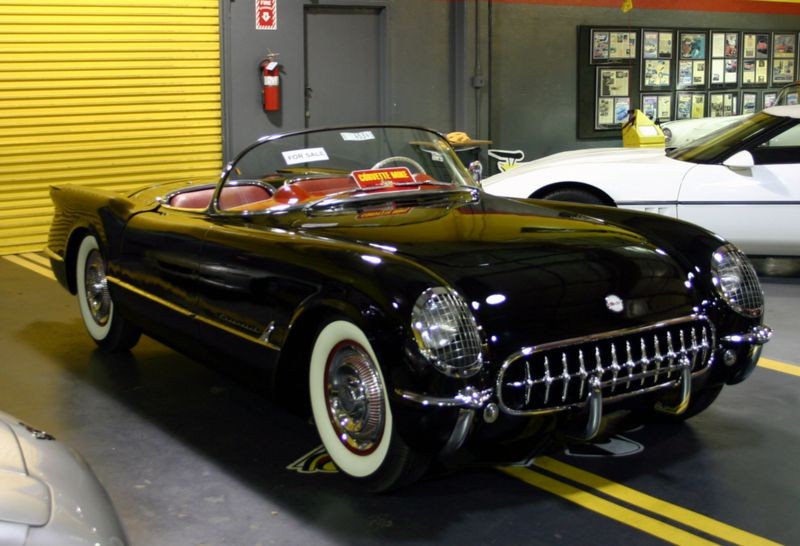
When I went to buff out a 1954 Corvette for Corvette Mike I took lots of extra polishing pads because at that time the only DA style polishers available were the first generation polishers and I knew as my pads became wet with product they would stop rotating and the job would take longer. This car had an antique lacquer paint job on it so I didn't want to use rotary buffer but instead play it safe and use the PC.
I count 7 yellow polishing pads in the below picture, as one pad would quit rotating effectively I would swap it out to a clean, dry pad.

I have extensive before pictures documenting how horribly scratched, swirled and water-spotted the paint was on this car but here's a few after shots...


Originally Posted by xxxc5
2. Jeweling/Burnishing - Would it be beneficial or a waste of time after I'm finished polishing with FG to go back again with a grey or blue pad polish again with FG?
Well if you do the FG step correctly with a polishing pad then that would be your jeweling step. Some might argue otherwise but once you hit a plateau of finish quality which you should be able to achieve with the FG step with a polishing pad, doing the FG step over again won't or at least shouldn't improve the results from the FG step if you did FG step correctly. AT least not enough to make a visual difference.
When finish polishing, start out with firm pressure but for your last passes you light up the pressure. You can also break the FG step into two steps, firm pressure for the first step and medium to light pressure for the second application, which some would say is the jeweling step, but however you want to describe it, the point is to work the finish up to a swirl-free, CLEAR high gloss.
If you like, you can re-polish with a softer finishing pad but as hard as the paint appears to be I'm not sure it will improve what you achieve with the polishing pad.
[quote=xxxc5;272131]
3. Rough Feel After FG - I've noticed that the finish does not feel smooth after using FG. It's rather rough actually. When I wipe down with QD, the slickness returns. Am I doing something wrong or causing damage?
There's a difference between rough and squeaky clean. Rough would feel like you need to clay the paint. Squeaky clean would feel like you hand won't slide over the paint even though the paint is smooth.
If it's squeaky clean that's okay. If it's rough, that means something else is wrong.
Originally Posted by xxxc5
4. Paint Polish Enhancer - I have a bottle sitting on my shelf begging to be used. Does this product factor into this correction process or should I just reserve using that for when I want to strip old wax/sealant before applying new?
Doesn't factor in. Once you bring your polisher down onto the paint using the Wolfgang Total Swirl Remover the PPE just lost it's job to a more aggressive product and now there's no need for it.
Originally Posted by xxxc5
Thanks in advance for your continued support!
Steve
I hope the above answers helped a little. Now that you have some time behind your PC, anytime you upgrade to a second generation tool you'll really appreciate the power of the new tool.
Once you get the new tool, place a clean pad on the old tool and take it inside the house and call it a back massager.

-
Junior Member
Re: WG TSR/FG & PC 7335 Technique
Thank you Mike for answering everything in detail!! I have everything I need to know to continue on. And don't feel bad about the truth on the DA. Your honest assessment prepared me for what I was in for so it wasn't a surprise. I have planned my schedule accordingly. BTW, the finish after FG is in fact sqeaky clean, not rough. Thank you for that descriptive term. I was off the mark on my assessment and how to clarify what I was feeling.
I will post pics and keep you updated on the progress. Thanks again!
-
Re: WG TSR/FG & PC 7335 Technique
Originally Posted by xxxc5
BTW, the finish after FG is in fact squeaky clean, not rough. Thank you for that descriptive term.
I was off the mark on my assessment and how to clarify what I was feeling.
If it's smooth, but squeaky clean, as in your hand won't slide but will rather stick then that's completely normal.
After years of posting to forums I learned how important one little word could be for a host of different reasons. It taught me to be very careful when choosing the right word or words to convey a thought. I don't know if the below is a famous quote from someone else or not but if it is I'm certainly not making claim that I wrote it, it's just an observation after years of posting to forums and something I've been writing ever since the BC years in the White House.
"Words mean things, just ask any lawyer"
Nuff said as that's usually a portion of a rant saved for Wax Wars suffice to say glad I could help.
Looking forward to your success!

-
Newbie Member

Re: WG TSR/FG & PC 7335 Technique
Excellent post....  I clarify a couple of questions about "jewelling polish" and the FG. I will like to see some pictures in the future. This is a great site. Thanks Mike! I clarify a couple of questions about "jewelling polish" and the FG. I will like to see some pictures in the future. This is a great site. Thanks Mike!
-
Regular Member

Re: WG TSR/FG & PC 7335 Technique
As I'm about to venture into the TSR--this is really a great thread!
-
Re: WG TSR/FG & PC 7335 Technique
Mike- you mentioned tht WG PPE would not be necessary after the WG TSR3.0/ WG FG steps. Doesn't the PPE provide some cleaning of residue and "filling"...maybe help hide some remaining swirls?? Always enjoy your informative replies.
-
Re: WG TSR/FG & PC 7335 Technique
Originally Posted by Waxmax
Mike- you mentioned the WG PPE would not be necessary after the WG TSR3.0/ WG FG steps.
Doesn't the PPE provide some cleaning of residue and "filling"...maybe help hide some remaining swirls??
After machine cleaning and polishing by machine with foam pads and the Wolfgang TSR 3.0 and the Finishing Glaze, all the shallow swirls should be removed and only deeper swirls and RIDS would be remaining. At this point hand applying Wolfgang Paintwork Polish Enhancer isn't going to improve the results over what the machine has produced.
If there are any fine swirls in the paint a wax or paint sealant will likely do as good a job at filling them as the PPE
The Wolfgang Twins are very good at creating a clear, high gloss finish and that is one of the primary goals why a person machine cleans and polishes paint, so it's not that Wolfgang Paintwork Polish Enhancer doesn't do what the label says it will do it's just you've already accomplished these goals with to machine applied products.
After the Finishing Glaze it's time to go to wax, not start in with a new cleaning process.
Good question!
-
Re: WG TSR/FG & PC 7335 Technique
Thanks Mike! Your prompt and informative reply is appreciated. Now, take the rest of the day off!
-
Re: WG TSR/FG & PC 7335 Technique
Originally Posted by Waxmax
Thanks Mike! Your prompt and informative reply is appreciated. Now, take the rest of the day off!
Think I'll eas some lunch and then live life on the edge and try to remove some water spots with the Griot's 3" Mini Polisher.
Similar Threads
-
By bcgreen in forum Griots Garage Polishers - BOSS - 6" DA - 3" DA
Replies: 24
Last Post: 10-24-2019, 07:10 AM
-
By bcgreen in forum Wool & Foam Buffing Pads
Replies: 2
Last Post: 05-28-2017, 05:04 PM
-
By MakeItShine in forum Porter Cable 7424XP Dual Action Orbital Polisher
Replies: 12
Last Post: 07-25-2016, 07:32 PM
-
By Whitewater25 in forum Porter Cable 7424XP Dual Action Orbital Polisher
Replies: 7
Last Post: 02-17-2015, 10:17 AM
-
By dublbass606 in forum Porter Cable 7424XP Dual Action Orbital Polisher
Replies: 11
Last Post: 02-22-2014, 04:20 PM
 Members who have read this thread: 0
There are no members to list at the moment.
Posting Permissions
- You may not post new threads
- You may not post replies
- You may not post attachments
- You may not edit your posts
-
Forum Rules
|
| S |
M |
T |
W |
T |
F |
S |
| 31 |
1
|
2
|
3
|
4
|
5
|
6
|
|
7
|
8
|
9
|
10
|
11
|
12
|
13
|
|
14
|
15
|
16
|
17
|
18
|
19
|
20
|
|
21
|
22
|
23
|
24
|
25
|
26
|
27
|
|
28
|
29
|
30
| 1 | 2 | 3 | 4 |
|


 Reply With Quote
Bookmarks